Volume compression what. How to shrink a volume or partition in Windows. Shrinking a volume using Disk Management
Editing partitions and volumes helps out in case of thoughtless disk partitioning at the beginning of Windows installation. Any shortcomings made during installation can be easily corrected.
Why do you need to change hard drive partitions?
Due to the large number of programs and games occupying almost all the free space, Windows begins to slow down, and defragmentation of partition C is carried out with errors.
The main reason for changing hard disk partitions is the lack of space on the system partition C.
At this time, up to several hundred gigabytes are empty on partition D, but moving some files to partition D forces you to reconfigure many third-party applications. In this case, it is easier to expand drive C at the expense of D.
How to expand C drive
Expanding drive C is possible using both Windows tools and third-party programs.
Extending the C drive directly in Windows 7
If you want to expand the disk using standard Windows tools, do the following:
- By pressing the Win + R buttons, bring up the “Run” window. Enter the command "diskmgmt.msc" and click "OK". The command “diskmgmt.msc” will open the Disk Management utility
- Select partition D and in the volume context menu click on “Delete volume”. Do not rush to edit hidden drives without a volume name, since deleting a partition will destroy all valuable files stored on it. The necessary information should be copied in advance to another disk or removable media. You cannot remove drive C, on which the system itself is installed. After disk D is destroyed, there will be unallocated space in its place.
 Select the volume and delete it
 - Select drive C and in the context menu give the command “Extend volume”.
- Set the number of megabytes that will be added to drive C. It will not be possible to exceed the maximum value, since the physical media itself is limited. Click Next.
 The size of the previously unmarked area will decrease by this amount.
 - Drive C will be enlarged. The size of drive D will be reduced by the megabytes given to drive C. Click on a free area of the drive and give the command “Create a simple volume”. When recreating volume D, this partition will be automatically formatted (quick format using Windows tools).
 Click on the remaining unallocated area and click on “Create Simple Volume” in the context menu
There is now enough space in C for Windows and your programs to run normally.
If you wish, you can use third-party applications, for example, Acronis Disk Director or Partition Manager. But it should be remembered that in the hands of inexperienced users, alternative programs often become not a “magic wand”, but a means of destroying the user’s files, and only a computer service center will be able to restore your lost data.
Video: Extending a volume using Windows 7 tools
Expanding the C drive when reinstalling Windows 7
When installing Windows, you will not skip the stage of changing disk partitions. During the reinstallation process, the program will ask which partition to install the system in and will suggest redistributing the hard drive space.
There are two types of Windows installations: upgrade and full installation. The update is carried out on top of the existing system, preserves all installed programs, but resets system parameters. Full installation - installation with formatting of the system partition, or installation on another partition of the hard drive. If you want to change hard disk partitions, then you need to choose the second installation type.
If you really need a “clean” installation of Windows, do the following:
- Insert the installation DVD or USB flash drive and restart your PC.
- To open the BIOS window, press the Del, F2, or Esc key during system startup (the choice of key depends on the computer manufacturer). In the window that opens, use the arrows to select “Boot”.
 In the window that opens, use the arrows to select “Boot”
 - Next, use the arrows to open the “Boot Device Priority” tab and in the list, select the boot device from which you need to boot the system. Close the BIOS and save the changes.
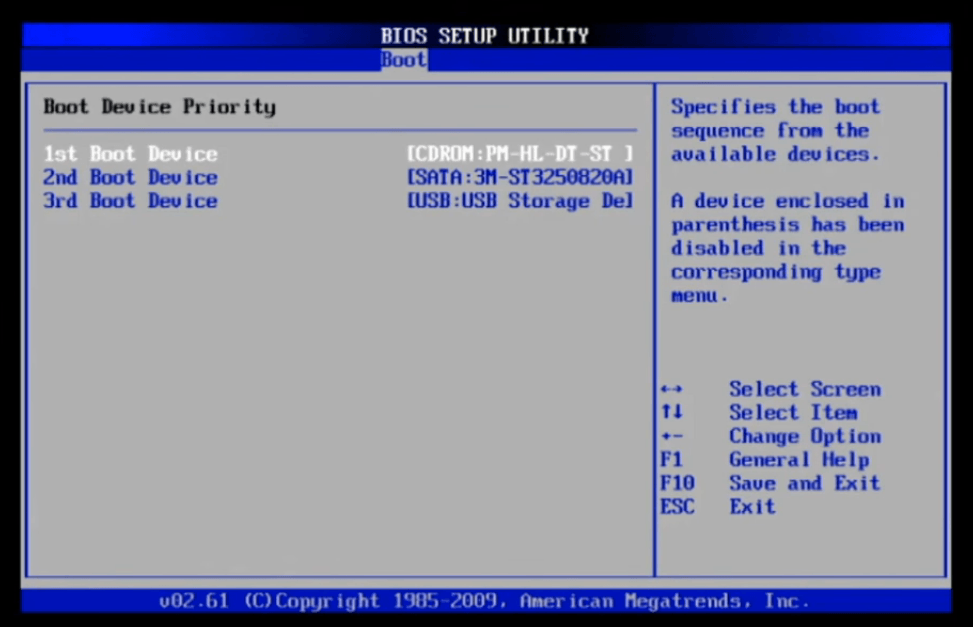 In the list, select the boot device from which you need to boot the system
 - Wait for the installation program to load into the PC's RAM.
- Select the type of Windows reinstallation.
 Select full Windows 7 installation
 - For example, one disk and one partition are taken. Select the drive and click Disk Setup. All your files should be copied to other drives in advance.
 Select the drive and click "Disk Setup"
 - Additional links will appear - click the “Delete” link. A warning about data transfer will appear, click “OK” and delete the partition. Do the same with adjacent sections (D, E, etc.), if there are any.
 Click "OK" if your personal files have been copied to other media
 - After removing existing partitions, you will have an unallocated (unformatted) disk area, which is the full size of the hard drive. To create new sections, click the “Create” link.
 Windows 7 Setup will help you create new logical drives
 - Specify the size of partition C, and create partition D in the same way. Go to partition C and format it. A quick format will be applied (clearing the disk table of contents).
 The installer requires you to format partition C
After formatting, Windows will continue to be reinstalled. Section C has been successfully modified.
Video: resizing partitions during reinstallation of Windows 7
Why can't I expand a volume in Windows 7?
A situation where the “Extend volume” option is inactive is possible. For example, we take the extension of the same C drive.
 A situation where the “Extend volume” option is inactive is possible
 - a spanned volume was created as D, which includes, for example, disks D and E. Transfer files from these partitions to other media. Remove this spanned volume;
- you forgot to delete all subsequent volumes, including drive D. Expanding the previous volume only works when deleting the next one.
How to delete a volume
You can only add an unallocated partition to a disk, which appears after deleting a volume.
Deleting a volume in Windows 7
To delete a volume:

You will be left with free space the size of this volume, which can now be attached to another partition.
Why can't I delete a partition or volume?
In some cases, removal may be difficult.
The reasons are as follows:

How to remove the swap file
To make volume deletion available, do the following to eliminate the Windows page file:
- From the Start menu, go to Control Panel.
 From the Start menu, go to Control Panel
 - Go to the “System” section.
 Go to the "System" section
 - Go to "Advanced system settings".
 Click on "Advanced system settings"
 - In the "System Properties" window, go to the "Advanced" tab and click on the "Options" button in the performance settings.
 Click this button
 - In the performance settings window, select the “Advanced” section and click on “Change”.
 Select the “Advanced” section and click on “Change”
 - In the virtual memory settings window, uncheck the option to automatically select the paging file size and check the box next to “Without paging file.” Click on the "Set" button.
 Uncheck the option to automatically select the paging file size and check the box next to “No paging file”
 - Click "Yes" when prompted to clear the page file.
 Answer yes to the request to clear the page file
 - Close all windows by clicking "OK" and restart your computer.
Go back to Disk Management and try to delete the volume again. Check to see if this volume is connected to a neighboring volume on the same partition.
How to shrink a volume
The disk can also be expanded by compressing it. As a result of compression, free space will be obtained, which can be used to create a new partition or volume.
Features of volume compression in Windows 7 are as follows:
- compression works only for primary and secondary partitions, as well as in the NTFS file system. If the partition or volume is formatted in FAT32, move the data from it and reformat (or convert) it to NTFS. To do this, call the disk context menu and click “Format”;
- if a partition or volume has many bad sectors, it will not be possible to shrink it;
- The page file, hibernation files, and recovery point data present an additional challenge to compacting partitions and volumes. Compression will not proceed beyond the second area of free space, counting from the beginning of the volume.
Shrinking a volume using Disk Management
If you want to shrink a volume using standard Windows tools, then:

Shrinking a volume using the command line
If the volume shrink option in Disk Management is no longer available, use the Windows Command Prompt. It can bypass the inactivity of some actions that are hidden by the Windows graphical shell. The instructions are universal for Windows 7/8.x/10.
- Search for the Command Prompt application in Start and run it with administrator rights. Tasks beyond the use of application programs often require administrator privileges in Windows.
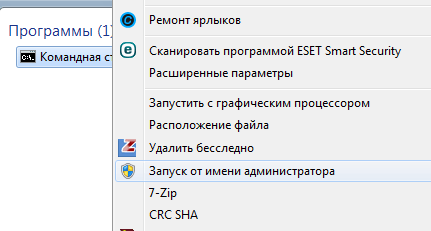 Launch the Command Prompt application with administrator rights This command displays a list of disks, partitions and volumes. The command line reports the maximum available volume space for compression
 - Enter "shrink desired=(number in megabytes)" which you want to shrink. The “shrink” command is entered with parameters, and if they are missing, all available content will be compressed.
 The “desired” attribute is a variable that corresponds to a value in megabytes
When volume compression is complete, the command line will display a message indicating that the volume was successfully reduced by the specified megabytes. Using the Disk Management application, make sure that there is free space in which you can create a new volume.
Video: Shrinking a volume using the command line
Expanding, compressing, deleting, adding new partitions and volumes using a standard Windows utility is not difficult. The main thing is not to lose valuable data that you have been collecting and creating for many years.
By default, most hard drives are accompanied by two volumes: C and D. These are the main partitions on the hard drive (volumes or root directories) that are strictly separated from each other. First of all, they are made so that the system does not have to wander in the wilds of heavy films and games on the way to vital files. For ordinary users, the ideal placement of programs, games and files is: everything light and frequently launched is on the system drive (C by default), everything heavy and unimportant is on the second disk, an alternative OS is on the third. And in order to most efficiently distribute space between volumes or change their number, you should be able to manage disk space.
How to open hard drive management
Like most Windows Settings windows, Disk Management has many doors and can be accessed in many different ways. The simplest ones: right-click on the start menu and find the required item there (not available on all versions) or type in “Create and format partitions” in the search.
In Windows 10, “Hard Disk Management” is called “Creating and formatting hard disk partitions,” but in the window signature the name remains the same, and “Disk Space Management” is a completely different window with limited functionality.
If for some reason this method does not suit you, here is the path to disk management, which has not changed since XP:
- Right-click on Start and open Control Panel. If it is not there, you can find it through the search.
- Open the "System and Security" category when categorized.
- Scroll down and click “Create and format hard disk partitions”, under the “Administration” group.
You cannot access control via the command line. There is only a separate set of disk management commands as a fallback, but this is quite complex and pointless.
If it doesn't open
If the system does not allow you to manage disks, the issue is a limitation of user rights, since for this you need to have administrator rights. Most likely, the root cause of the problem is a virus on your computer and after following the instructions, be sure to scan everything and everyone with an antivirus.
Before proceeding with the method described below, try disabling your antivirus and try again.
- Search the Start menu and find and open “regedit”.
- On the left side of the window, go to the path “HKEY_LOCAL_MACHINE/SYSTEM/CurrentControlSet/Control” and click once on the “Windows” folder contained there.
- On the right side of the window, open the “CSDVersion” option.
- Set the parameter to zero and confirm the changes.
Disk space management
So-called disks are correctly called partitions or volumes (you only have 1 disk, most likely), but given that even Windows calls them disks, this is not important.
To make one volume larger, you must first make another volume smaller. You can't just grab a spot out of nowhere and you have to find a donor first. It is worth saying that in Windows 10 there is no function for merging volumes. If you want to merge, you will have to use the standard methods described below and copying information from disk to disk.
There is one very important non-obvious rule that imposes a strong limitation on disk management, and before you start wasting space, you need to consider the most popular mistake.
Why is "Extend Volume" inactive?
Pay special attention to the order of the volumes in the lower half of the window.
In our case, the order is: C, J, D. After we pinch off a piece of space from one of the disks, it will appear behind the donor volume. For example, if we take a piece from drive J, the order will be: C, J, Free space, D. Free space can only be filled into adjacent partitions. That is: return to the donor volume (J) or expand the next disk (D). We cannot expand drive C, since there is an obstacle in the way in the form of drive J.
To expand the C drive, you need to completely remove J and make it a remote space. But if this doesn’t seem enough and you want to expand to include drive D, you’ll have to delete it too.
Expansion of the first volume is possible only with the help of an individual multi-pass or specialized programs.
For example, in this case, to expand drive C at the expense of D, you can do the following multi-step:
- Creating a new volume using drive D.
- Moves all files from drives J and D to a new volume.
- Removing the J drive and expanding the C drive using the freed up space.
- Removing drive D and expanding drive C using the freed up space.
- We call the new volume disk D.
- We move from C to D as much space as needed.
- We create drive J at the expense of C and move old files from drive D to it.
It all depends on the order of the disks, their volume and the availability of free space, so the multi-pass is individual.
If the disk with the system is not the first, then expanding the ones in front of it is impossible, since the disk with the system cannot be removed.
Compression
- Right-click on the partition you are interested in and select “Shrink Volume...”.
- Set the donor space size and click Shrink.
- Free space will appear behind the donor volume.
If you cannot compress the volume, you must either moderate your appetite or delete part of the contents of the volume.
Removal
- Right-click on the volume and select "Delete Volume...".
- All its contents will then be deleted.
- The freed space will appear in the place of the deleted volume.
Extension
The system disk expands just like all the others. But due to the error described above about the impossibility of expanding the volume, this is not easy to do. Before expanding your disk, be sure to read the first part of this chapter, which covers the most common disk management error.

Creation
Windows 10 does not recognize the difference between a local disk and a simple volume. In principle, there is no difference between them. The distinction between volumes and local disks was used on older operating systems and was purely a conditional limitation. By creating a simple volume, you create a full-fledged local disk.
- Right-click on the unallocated space and select Create Simple Volume.
- Select the size of the allocated space. You will not be able to use non-adjacent free space.
- Select a letter for the new volume.
- It is better to leave all settings as default.
- A new volume will appear in place of the used space.
Video: Disk Management in Windows 10
Defragmentation
The entire contents of the hard drive are divided into many small fragments, and when new information is entered, these fragments are located taking into account their best position for sequential reading, one might say side by side. However, when they change, new information is recorded and existing information is moved, a well-ordered structure gradually tends to become more chaotic. Moreover, bad sectors appear, where the reading process is greatly hindered. The process of optimizing this entire structure is called defragmentation and is recommended for periodic execution at least once every six months.
Checking the disk for errors is also included in the optimization process.
Defragmentation is intended exclusively for HDDs. For SSDs, it is not only dangerous, but also harmful. If you don't know what you have:
- HDD - The computer turns on for 10 seconds or longer, and the hard drive looks like a box with a round part.
- SSD - Windows starts in less than 7 seconds, and the drive looks like an electrical contraption, just like the other components.

Cleaning drive C
In addition to simply cleaning the desktop and deleting unused programs, it is worth getting rid of files that are actually called junk. Windows 10 has a very specific place for collecting junk and junk files - this is the Temp folder. Everything in it can be deleted without any regrets and the slightest risk of harming the system.
Cleaning the C drive through its properties in Explorer is less complete and does not affect some temporary files.
- Go to settings.
- Open the "Privacy" section.
- In the General tab, disable Ad ID and Start Tracking.
- Go to the Speech, Handwriting, and Text tab and turn off speech services if they are active.
- In the “Feedback and Diagnostics” tab, select the main method of data collection, disable the only switch and disable the generation of reviews.
- In the Background Applications tab, turn off the main switch.
Programs
As mentioned above, standard Windows tools for managing hard drive space are very limited in capabilities. If you are faced with an insurmountable problem or are simply too lazy to bother with moving space multiple times, you can always use the help of a special program that will do all the dirty and mental work for you in just a couple of buttons.

Proper distribution of disk space is a simple and very far-sighted action, and timely defragmentation is the key to order on your computer. You should only change the size of volumes or their number after carefully considering your future plans for using the computer and distributing priorities between heavy games and programs. The main thing is to always leave at least 10 GB of free space on each volume, especially on the system one, and do not forget about defragmentation.
1. To perform operations on hard drive partitions, you must use an account with administrator rights.
2. If, during the process of reducing a disk partition, Windows prompts you to convert a basic (simple) volume to a dynamic one, do not do this under any circumstances.
3. Before shrinking your hard drive partition, disable hibernation and the page file. These files are non-movable and may become fragmented. Therefore, the space available to shrink a partition may be less than the free space on that partition.
4. Make sure that in the service settings Disk Defragmenter The startup type is set to "Manual". If this service is disabled for you, then when you try to shrink the volume you will receive an error Virtual Disk Manager:
The specified service cannot start because it is disabled or all devices associated with it are disabled.
Method 1: Shrinking a Partition Using Windows 7 Disk Management (GUI)
1. Open Control Panel (View: Icons) > Administrative Tools > Computer Management.
2. From the left menu, select Disk Management.
3. In the middle part of the window, right-click the partition whose size you want to reduce, and select the command from the menu that appears Shrink Volume.
4. Specify the volume in megabytes (1 gigabyte = 1024 megabytes) by which you want to reduce this partition.
5. Click the button Compress.

6. Once the selected partition is shrunk, there will be unallocated space equal to the amount you specified in step 4.
7. Close the Computer Management Console window.
Method 2: Shrinking a partition/volume using the DiskPart utility (command line)
2. Enter diskpart and press ENTER.
3. Type list volume and press ENTER.
After this command, a list of all partitions (volumes) will be displayed on the screen and you can select which one should be reduced. Please note that each section has its own serial number, starting from zero.
4. Enter select volume X (instead of X enter the partition number you want to reduce).
After this command, you can perform operations with the selected partition.
5. Type shrink querymax and press ENTER.
After this command, the size of the selected partition or volume available for reduction will be displayed on the screen. For example, if you can shrink a partition by 123 gigabytes, you will see it. Of course, you cannot reduce the partition size further than specified in this step.
6. This step will directly reduce the partition, so be careful. Here you need to specify the amount by which you want to reduce the volume or partition of your hard drive.
- To shrink the partition as much as possible using all the space shown in step 5, type shrink and press ENTER.
- To shrink the partition by only a certain number of gigabytes (this amount is less than the space displayed in step 5), type shrink desired=XYZ and press ENTER. Instead of XYZ specify the amount in megabytes by which the selected partition or volume should be reduced. Remember that 1 gigabyte is equal to 1024 megabytes. For example, the command shrink desired=20480 will shrink the selected volume by 20 gigabytes.
7. Type exit and press ENTER to exit DiskPart. Once you exit, you can close the Command Prompt window.
Using Disk Management, you can reduce the size of your hard drive volume to create a new partition.
Windows 7 includes several tools to manage your computer's configuration and various aspects of the operating system. Sometimes it is necessary to reduce the size of a volume - distributed space on a hard drive - to free up space to create another partition. Until recently, this would have required the use of third-party utilities, but with the advent of the built-in Disk Management tool in Windows 7, the need to install special software has disappeared.
Volume compression
First, you need to run Disk Management with administrator rights. Open the Start menu, type “diskmgmt.msc” into the search bar without quotes, right-click the “diskmgmt” link in the search results and select the “Run as Administrator” option from the context menu (Figure A).
Figure A: Run Disk Management with Administrator rights.
The window shown in Fig. will open. B.

Figure B. Disk Management window.
As you can see, my computer has a data recovery partition, a system partition, and a Data partition. It’s better not to touch the system partition, so for example, let’s shrink the “Data (D:)” partition.
Right-click on the partition you want to shrink and select the Shrink Volume option (Figure C).

Figure C: From the context menu, select the Shrink Volume option.
The system will take a few seconds to analyze the disk, and the dialog box shown in Fig. 1 will appear. D.

Figure D. Based on the analysis results, a dialog box appears with general information about the volume.
In this window, you can only change the value in the “Amount of Space to Shrink in MB” field. For example, let's reduce volume “D:” by 5000 MB (5 GB), as shown in Fig. E. When you're ready, click the Compress button.

Figure E: Shrink a 5000 MB volume.
Once the operation is complete, there will be new unallocated space on your hard drive (Figure F). Its actual size will be slightly less than what was indicated during compression, since a small part of this space will be allocated to the Windows file system.

Figure F. New unallocated space.
Using Unallocated Space
Now you need to create a partition on the unallocated space that the operating system can use. This is not at all difficult, but it is done in several stages, so I will talk about creating a new volume in the next article.
Good day. Today we’ll look at a fairly popular topic for beginners, this is working with already created hard drive partitions (you’ve already bought a new hard drive? :) and we’ll look at operations such as reducing the volume (compression) of the hard drive and expanding it using unallocated area. To do this, we will not use any third-party programs, but will use the Disk Management utility built into the Windows operating system. So, why might we need this knowledge? Suppose you initially had it on your hard drive, but over time you decided that one is enough to store movies, music and photos, it’s easier to search :) Or another case, you have two local drives on your hard drive (let’s assume 2Tb), one for system (local drive C), the second for personal data (drive D), but when you partitioned them, you left too little space for drive C and this constantly creates discomfort for you. It is to solve such situations that this article was written.
In this article I will do, sequentially:
— Compression (reduction) of the local disk,
— Expansion (increase) of the local disk due to a new unallocated area.
This is what we need.
1) The first thing we need is to open the Disk Management utility. For the lucky owners of Windows 8.1 and 8, just right-click on the “Start” button (or in the lower left corner of the desktop for Windows 8) and select “Disk Management”. Everyone else needs to go to “Control Panel → System and Security → Administrative Tools → Computer Management → Storage Devices → Disk Management.”

3) Right-click on the partition on the right side of the window and select “Shrink Volume”.

4) A dialog box will open asking you to select the volume to compress. This window shows the current partition size, available (unused) space for compression, and the size of the local disk after compression, in megabytes. To maximize disk compression, you must defragment the partition before this operation. I'm using an empty disk, so I have almost all of its capacity available for compression. Enter the required number of megabytes in the “Size of compressed space” line and click “Compress”.


6) Now we will expand the partition using this unallocated area. To do this, right-click on the partition and select “Extend volume”.

7) The “Volume Expansion Wizard” will open, click next.

This page shows the available and selected unallocated areas, and you can also specify how much of the unallocated area should be used to expand the local disk (item “Select the size of the allocated space”). I use the entire volume, you look at your circumstances.
